This Guide is Still being refined, if you have any questions just let us know.
Introduction
Virtual PandaBank is a full version of Pandacoin’s latest wallet running on a virtual computer using a VNC. A VNC, or “Virtual Network Computing”, is a connection system that allows you to use your keyboard and mouse to interact with a graphical desktop environment on a remote server. It makes managing files, software, and settings on a remote server easier for users who are not so comfortable with the command line.
In this guide, we will be setting up VNC on a Debian server and connecting to it securely through an SSH tunnel. The VNC server we will be using is vnc4server, a fast and lightweight remote control package. This choice will ensure that our VNC connection will be smooth and stable even on slower internet connections.

We have setup the latest Virtual PandaBank as a Public demonstrator, so anyone can see and test it without the need to load any software on their pc. This is just a demonstrator and may be used by anyone, and even multiple users at once sharing control. Do not send it many Digital Pandacoin as anyone can spend them and we may want to rebuild it frequently.
To connect to our public demonstrator with your browser click here: http://45.79.190.254/webvnc/vnc.html?host=45.79.190.254&port=6080 Password is: newtestp
Getting your own Virtual PandaBank
You need to sign up for a linode Account, please use our referral code 8a86e7d984ebb05fea91a7485cb0bbca5e374ad8
When someone signs up using our referral code, we receive a credit of $20.00, so long as the person we referred remains an active customer for 90 days.
This helps us with our hosting costs for Digital Pandacoin related infrastructure.
Copy and paste or use our referral url link to get started.
https://www.linode.com/?r=8a86e7d984ebb05fea91a7485cb0bbca5e374ad8
There is a handy Getting Started with Linode Guide here and it says Use promo code DOCS10 for $10 credit on a new account.
https://www.linode.com/docs/getting-started
Sign Up
If you haven’t already signed up for a Linode account, start here.
- Create a new account at the Sign Up page.
- Sign in and enter your billing and account information. Most accounts are activated instantly but some require manual review prior to activation. If your account is not immediately activated, you will receive an email with additional instructions.
- Select a Linode plan and data center location

If you’re unsure of which data center to select, see our speed test to determine which location provides the best performance for your target audience. You can also generate MTR reports for each of the data centers to determine which of our facilities provides the best latency from your particular location.
Provisioning Your Linode
After your Linode is created, you’ll need to prepare it for operation by deploying a Linux and PandaBank distribution.
Logging in to the Linode Manager
The Linode Manager is a web-based control panel that allows you to manage your Linode virtual servers and services. Log in with the username and password you created when you signed up. After you’ve created your first Linode, you can use the Linode Manager to:
- Boot and shut down your virtual server,
- Access monitoring statistics,
- Update your billing and account information,
- Request support and perform other administrative tasks.
Rebuild using our PandaBank public StackScript
After creating a new Linode, select it to open the Linode Manager Dashboard.
4. Click on Rebuild

5. Click Deploying using StackScripts
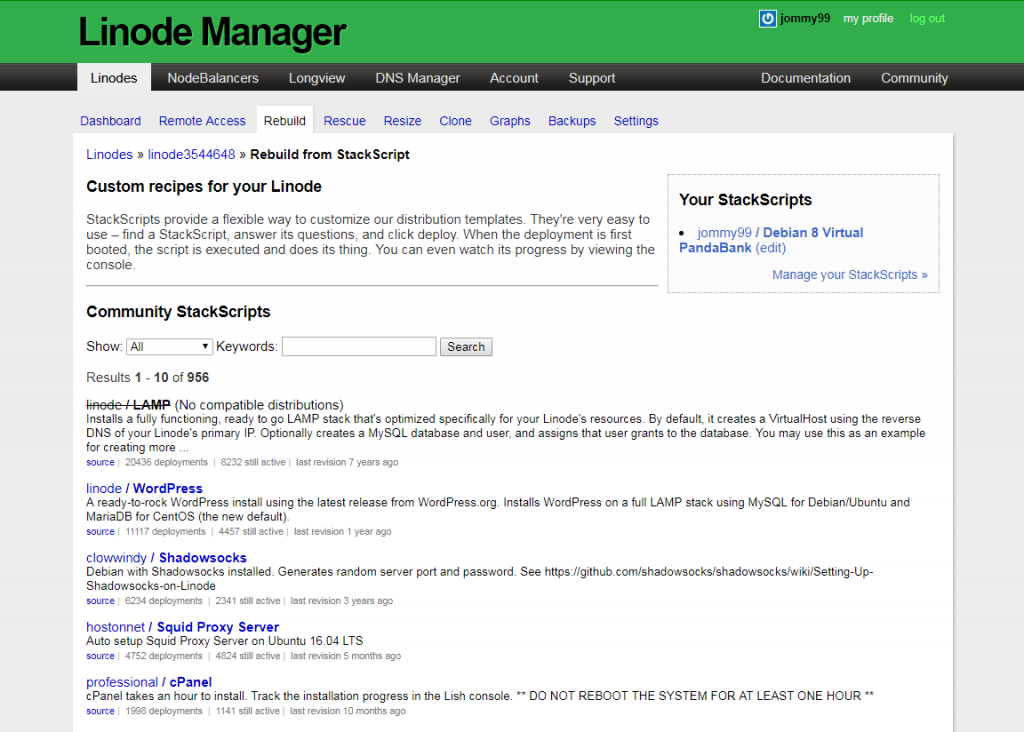
6. Enter PandaBank into keywords and click search to locate our Debian 8 Virtual PandaBank StackScript
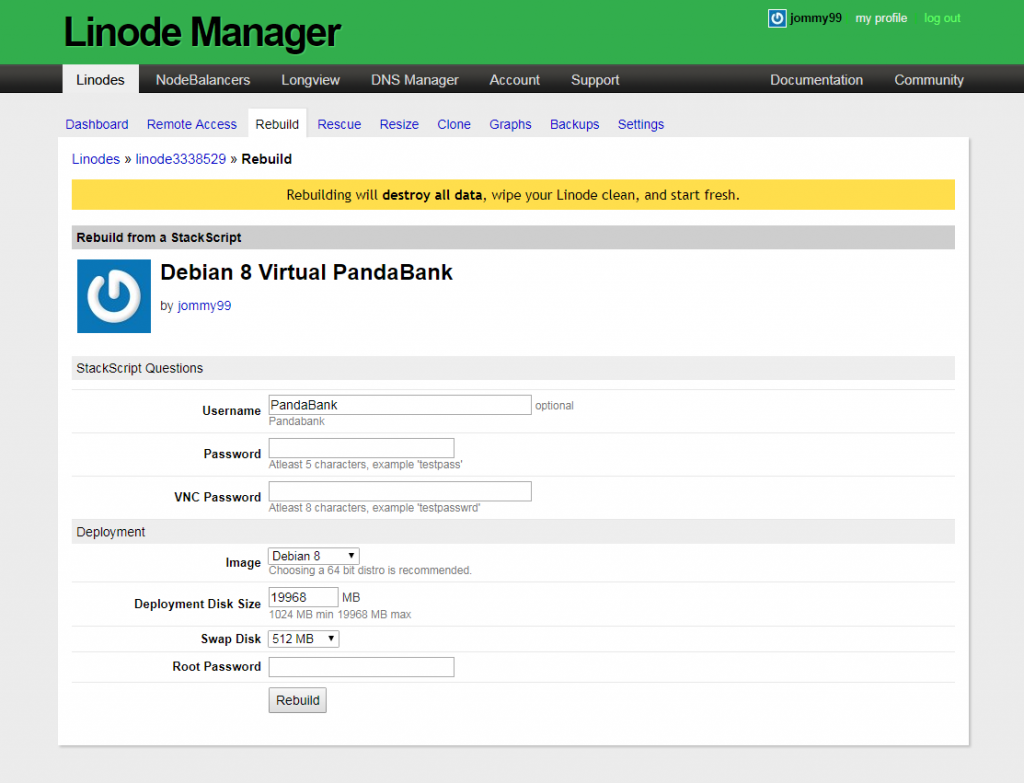
7. Enter the Desired Username and password and VNC Password for your Virtual PandaBank.
8. Select a swap disk size from the Swap Disk menu, we Recommend 512 MB.
9. Enter a root password for your Linode in the Root Password field. This password must be provided when you log in to your Linode via SSH and must be at least 6 characters long and contain characters from two of the following categories:
- lowercase and uppercase case letters
- numbers
- punctuation characters
10. Click Rebuild.You can use the Linode Manager’s Dashboard to monitor the progress in real time as shown below.
Booting Your Linode
Your Linode is now provisioned with the distro of your choice but it’s turned off, as indicated in the Dashboard.
11. Click Boot to turn on your Linode.
When booted, the Server Status will change from Powered Off to Running and there will be a successfully completed System Boot job in the Host Job Queue.
12. Find the IP Address of Your Linode
Your Linode has a unique IP address that identifies it to other devices and users on the Internet. For the time being, you’ll use the IP address to connect to your server. After you perform some of these initial configuration steps outlined in the Linode Quick Start Guides, you can use DNS records to point a domain name at your server and give it a more recognizable and memorable identifier.
Find your Linode’s IP address from the Linode Manager.
- Click the Linodes tab.
- Select your Linode.
- Click the Remote Access tab.
- Copy the addresses in the Public IPs section.


In this example, the Linode’s IPv4 address is 96.126.109.54 and its IPv6 address is 2600:3c03::f03c:91ff:fe70:cabd. Unless your Internet service provider supports IPv6, you’ll want to the use the IPv4 address.
Logging in for the First Time
Once the script is completed you can use a vnc viewing app Such as Tight VNC Viewer to connect to your vps via a VNC Gui Connection by connecting to the serverIp:5955
What is TightVNC?
TightVNC is a free remote control software package. With TightVNC, you can see the desktop of a remote machine and control it with your local mouse and keyboard, just like you would do it sitting in the front of that computer. TightVNC is:
- free for both personal and commercial usage, with full source code available,
- useful in administration, tech support, education, and for many other purposes,
- cross-platform, available for Windows and Unix, with Java client included,
- compatible with standard VNC software, conforming to RFB protocol specifications.
With TightVNC, you can:
- cut your expenses and save your time on traveling,
- help your friends and family to solve problems with their computers remotely,
- make sure nothing wrong is happening on your computers when you are away.
Download Now!
Once logged in you will see a first time startup message.
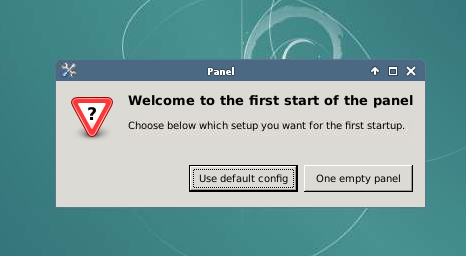
select default configuration. and you’re good to go.
Recent Comments